Saturday, March 10, 2012

DIY String Chandeliers

Jessica of Wednesday Inc shows us how to make those gorgeous twine chandeliers from the inspiration shoot she shared with us this morning. Using balloons, glue and twine, you can also make these lanterns for your wedding – and then bring it home and use it as your very own mid century lampshade.
twine yarn ball lanterns
What you will need are: balloons, glue, yarn, tray for glue, corn starch 1/2 cup of Corn starch, 1/4 cup of Warm water, clear fast drying spray paint, hanging lamp cord or fishing line (depending on your desired final product), and a lighting kit if you’re looking for a fully functional lantern. Jessica recommends using a sharpie to mark on the inflated balloon how much room you need to leave for the lighting cord. She also recommends coating the balloon with vaseline prior to wrapping the yarn coated with glue so it doesn’t stick on the balloon once it’s dry. You can see all the details on Jessica’s blog.
diy twine yarn chandelier
Are you getting excited to try to do this at home as much I am?
diy twine yarn chandelier glue balloons
Instructions:
1. Inflate the balloon to a medium size so the shape is a little rounder.
2. If you’re looking to make a lampshade out of the string chandelier, use a sharpie to mark around the knot on the balloon.
3. Before you start working, we recommend using a tarp.Mix corn starch, glue and warm water together until it has a smooth texture.
5. Smear the vaseline all over your balloon until it is completely coated so th twine wet with glue won’t stick on the balloon after dry.
6. You can start a little assembly line with friends by one of you feeding the yarn through the glue mix and giving to another person to wrap it around the balloon.
7. Start wrapping the balloon vertically, slowly changing to wrapping. For a seamless look, tuck the ends of the twine under one of the wrapped strings.
8. Wait 24 hours until the balloon has completely dried before popping the balloon.
9. Spray the string chandeliers with clear fast drying spray paint et voila!

Sunday, March 4, 2012

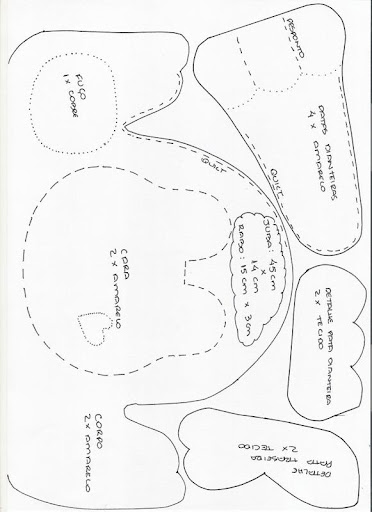
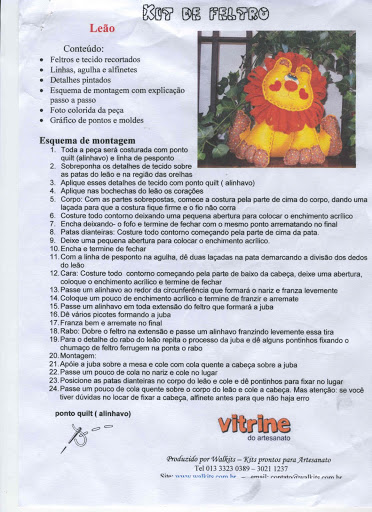
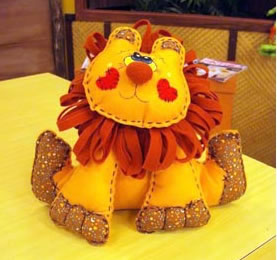
Molde leãozinho de feltro

Molde leãozinho de feltro

Materiais:
  • FELTRO NAS CORES AMARELO, FERRUGEM E VERMELHO
  • TECIDO ESTAMPADO
  • LINHA DE PESPONTO NA COR PRETO
  • ENCHIMENTO ACRÍLICO
  • TINTA PARA TECIDO NAS CORES BRANCO, AZUL E PRETO
  • PINCEL FILETE
  • COLA QUENTE
  • AGULHA
  • TESOURA
Passo a passo:
1. Toda a peça será costurada com ponto quilt (alinhavo) e linha de pesponto
2. Sobreponha os detalhes de tecido sobre as patas do leão e na região das orelhas
3. Aplique esses detalhes de tecido com ponto quilt ( alinhavo)
4. Aplique nas bochechas do leão os corações
5. Corpo: Com as partes sobrepostas, comece a costura pela parte de cima do corpo, dando uma laçada para que a costura fique firme e o fio não corra
6. Costure todo contorno deixando uma pequena abertura para colocar o enchimento acrílico
7. Encha deixando- o fofo e termine de fechar com o mesmo ponto arrematando no final
8. Patas dianteiras: Costure todo contorno começando pela parte de cima da pata.
9. Deixe uma pequena abertura para colocar o enchimento acrílico.
10. Encha e termine de fechar
11. Com a linha de pesponto na agulha, dê duas laçadas na pata demarcando a divisão dos dedos do leão
12. Cara: Costure todo contorno começando pela parte de baixo da cabeça, deixe uma abertura, coloque o enchimento acrílico e termine de fechar
13. Passe um alinhavo ao redor da circunferência que formará o nariz e franza levemente
14. Coloque um pouco de enchimento acrílico e termine de franzir e arremate
15. Passe um alinhavo em toda extensão do feltro que formará a juba
16. Dê vários picotes formando a juba
17. Franza bem e arremate no final
18. Rabo: Dobre o feltro na extensão e passe um alinhavo franzindo levemente essa tira
19. Para o detalhe do rabo do leão repita o processo da juba e dê alguns pontinhos fixando o chumaço de feltro ferrugem na ponta o rabo
20. Montagem:
21. Apóie a juba sobre a mesa e cole com cola quente a cabeça sobre a juba
22. Passe um pouco de cola no nariz e cole no lugar
23. Posicione as patas dianteiras no corpo do leão e cole e dê pontinhos para fixar no lugar
24. Passe um pouco de cola quente sobre o corpo do leão e cole a cabeça. Mas atenção: se você tiver dúvidas no locar de fixar a cabeça, alfinete antes para que não haja erro.


Artesanato de Garrafa Pet

A idéia inicial era fazer um joguinho de boliche para as crianças, mas você pode fazer e encher de balinhas para presentear a criançada.
Ela usa apenas os fundos das garrafas que são encaixadas formando o corpo do pinguim.